Tuesday, May 31, 2011

Teacher Thank-you's

In my former life, I taught high school and would have taken any token of appreciation that I could get.  My dad's an elementary principal and my mom  is a teacher.  Let me let you in on some appreciation giving secrets.  My dad says his very favorite thing are handwritten notes and hand drawn pictures with sincere thanks.  While he appreciates the gesture, the man could start his own coffee mug company-and he doesn't drink coffee.  My mother has baskets and baskets of lotions and bubble baths. Again she appreciates the gesture, but her current stockpile will last her for decades. Especially since she's actually allergic to most of them.  She also has a pretty huge stash of candles as well. 

Our PTA did something genius.  They had each teacher fill out a  survey about some of their favorite things (restaurants, hobbies, etc).  They are kept in a large binder in the office for parents to check out.  Today after school, I'm going to have my kids write a thank-you note to their teachers.  I'm including a Sonic gift card, because nothing tastes like summer to me more than Sonic. (and honestly, b/c they sell them at the check-out of the grocery store)

I bought invitation envelopes (4 3/4 x 6 1/2 inch).  I took a 12 inch piece of card stock and cut in so it was 6  inches wide.  Then I folded it at 4 1/2 inches and 9 inches.  This gave me a 3 inch flap.
 Inside I attached a strip of paper to make a little pocket for the gift card.
 I glued some fun "summer" paper on the front. Then I punched a hole in the center of the flap.
 I cut a slit in the bottom flap and thread a piece of ribbon through.
 I tied it shut.  TADAA!

Monday, May 30, 2011

DIY Camera Straps

My sister is doing an online fundraiser to raise $ to help cover the costs of their adoption.  (http://www.plunderhere.com/shop.php?user_id=113407).  So I spent Friday and Saturday sewing.  Mostly I made camera straps.  Here's how I did it.

Step 1:

Measure your camera strap (Mine was 20 inches, so all my measurements are based on that.)

Step 2:

Cut out 2 pieces of felt 2x20 (fusible fleece would be great-but I didn't want to drive to the store)

Step 3

Cut 2 strip of fabric 3x22.  Optional: If you want a pocket for your lens cap, cut a strip 3x7 inches.

Step 4: Finish top and side edges of pocket and pin on fabric.

Optional:  If you'd like to add any ruffles or trim, sew it to one of the strips now.

 Step 5: Iron down side edges and fold down top edges (like you wrap a present).

Step 6: Place strips wrong sides together and sew close to the edge along the sides.  Leave top opens.


TADAA!

Plain
 Ruffles
 Pleated satin ribbon-this one's my favorite

Friday, May 27, 2011

Call me Frankenstein

So pretty much right after I blogged about being skin cancer free, my doctor called.  Apparently I had "bad margins" and had to go back in for Moh's Surgery.  I scheduled it for yesterday morning and had my husband take off work to come with me.  I'm not gonna lie, I was scared on the inside.  I'm not overly vain, but super villains aside-who wants a huge scar down your face?  I was also slightly worried that maybe it would be a little bigger deal than originally thought and want no part of anything to do with Cancer.

My hubby is in the Air Force which means we get free medical care.  It also means you don't chose your doctor.  I was relieved when mine came in and the nurse addressed him, "Good Morning, Chief".  Woohoo! The Chief of Dermatology would be cutting on me and not some brand new resident.   I got really queasy during the procedure (if you won't think less of me, I'll confess I was close to passing out).  I was numb, but it was still a creepy experience and the more I tried not to think about it, the more of course I thought about it. I think I was holding my breathe-which wasn't good. It also took way longer than the first time (5-6 minutes, instead of 2-3 minutes). I also would have handled it better if it would have been on my arm or back, but eyes freak me out.

 After the procedure, I went back to the waiting room to wait for my results.  Luckily, they got it all and I now have "clean margins".  So I went back so they could stitch me up.  I have 6 stitches and wasn't prepared for how big it would be.  Hopefully it will clear up nice.  They said if it doesn't, they can use a laser to treat the scar later.

Interestingly enough, he said that there is no medical evidence that products like Mederma do anything. I should have saved my $18.  He recommends petroleum jelly.

If you have weird reddish patches that won't heal-go see a doctor. Consider this my Public Service Announcement.

Thursday, May 26, 2011

Pettiskirt tutorial


I found my daughter a yellow swiss-dot dress that was absolutely adorable-except for the fact that it was see-through.  I thought a white cotton pettiskirt would make it cuter and a little more appropriate for Easter Sunday.  I've made elastic waist ones in the past, but I didn't want her to have a "bunchy" waist.
I thought an A-line skirt would work better. I cut two of these on the fold.
Then I sewed up the sides, leaving one side open.  I serged the part I didn't sew.  Then I used double fold bias tape to finish off the waist.
 I sewed on a hook and eye so she could close it.
She wanted a fairly large ruffle.  With my new ruffle foot (that I'm still trying to figure out), I sewed a 5 inch ruffle at the bottom.
 Tadaaa!
It's no longer see-through and has a cute vintage look w/ out a bunchy waist.

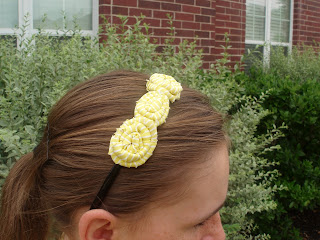
 She needed some hair bling.  I made 3 roses and glued them on a headband.

Check out some other clothes I've made here.

Wednesday, May 25, 2011

Thoughts on Thor

  Thor Movie Poster 1

There was a movie theatre next to our hotel in Fargo. We thought it would be a good way to spend the afternoon while resting hubby's legs for his marathon.  We looked up reviews for Thor and it scored well with critics and regular people, so we thought we'd give it a shot.  We watched the 2-D version-am I  the only one, that 3-D gives a headache? Maybe if we saw the 3-D version we'd like it better.
It wasn't  awful, but certainly far from great.  I think it's like so many of these types of movies that spend a ton of time and $ on the effects and not to much on the story.  I got the feeling that I was somehow watching an abridged version.  Plot and Character development just seemed thin. My husband was down right bored.  Honestly ladies, the guy that plays Thor is easy on the eyes and has a charming accent, so I think even if the movie is not that good, he's not a bad person to spend the afternoon with.

On a good note, it's one of the few summer blockbusters I'd let my kids watch.  I don't remember a lot of cursing (although I tend to notice it less when my kids aren't there) and there was no sex.  There are a lot of fight scenes, but nothing too gory.  The messages of the film are: friendship and family, peace over war, scientific discovery, and overcoming selfishness.   

If your kids are bored, my give-a-way ends 5/25 at midnight.

Tuesday, May 24, 2011

Eat, Pray, Love Review


I
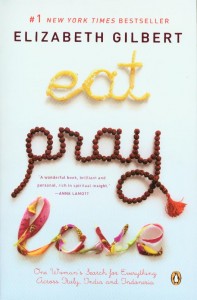
spent last weekend cheering on my hubby in Fargo, ND (that's an entire blog post in itself) during his first marathon.  Before we left, I was browsing my library for books, that I could download on my Nook and found Eat, Pray, Love.  It's a best-seller, they made a movie out of it, so I figured it would be pretty good read.  I didn't hate it, but I'm wondering if the book's success is more a product of a great marketing than a good story.  I was mild interested in the "Eat" section, but honestly found myself skimming through "Pray" and "Love".  The author is witty uses great metaphors, but I was still bored and found her a little self-absorbed.  I didn't hate it, but can't figure out what was so great about it either.  If you loved this book, please tell me what I'm missing.

The one idea that I did really like in the book, was the idea that every place and every person should have a word that perfectly describes them.  This was a very fun topic for my brain to stew over.  My kid's words would be: "Intense", "Play" and "Charm" and my husband's would be "Conquer".  I struggled trying to come up w/ my word.  At first, I thought it might be "Create", but I think that's a little too fancy for me and it makes me sound like I have some artistic talent.  I think my word is "Fix".  I fix  meals for my family, stuff around the house, and everyone in the family's problems.  I keep buying ugly houses and fixing them up. 

 So what's your word?
UPDATE:  I'm still waiting for someone to tell me what I missed and how this is a life-changing book.  Still no takers-but people have some great words.
Linking up here

Thursday, May 19, 2011

Free Stuff

This is a Sponsored post written by me on behalf of yoFreeSamples.com for SocialSpark. All opinions are 100% mine.

Do you like getting free stuff?  Of Course you do.

yoFreeSamples.com has been around since 2008, informing subscribers of daily free samples, contests, and coupons.  These offers can be sent directly to your inbox or you can follow them on facebook. 

All the free samples are listed by category.  There are even free samples for those of you that live in Canada or the UK. Since I am always painting something, I was exited to find the link for a free Glidden Paint sample.  There are also a ton of beauty samples.  To receive some some samples, you have to fill out a survey, but they also have a huge section of samples that you can get without having to fill out any surveys.  Most of these were for fast food. Yum.

They have a collection of hundreds of coupons that you can use to save money at the grocery store. I have a kid we call the human garbage disposal-the kid can EAT.  At least I can use coupons to help me save a few bucks on my rapidly expanding food budget. I love coupons.

If you are the lucky type, yoFreeSamples.com will keep you informed on all the greatest online contests.

Freebies

Coupons

Free Stuff

Visit Sponsor's Site

Mother-daugher Talent show?

My kid came home a few weeks ago all excited about the idea she suggested for her church group activity night-a mother-daughter talent show.  I was trying to be supportive, but finally asked her whose mother she was planning on taking to this.


 I'm not saying I'm devoid of talent, but my particular talent set just doesn't lend itself well to being performed. Vegas isn't calling me to book my one-woman extravaganza called "The Amazing multi-tasker".


My kid is talented on many levels and I suggested she display her musical talents  and I would display my talent of appreciating music.


She decided instead, that we would re-do some shirts and then model them for out talent. We found 2 long-sleeve t-shirts at Wal-mart on clearance (a common theme on the blog lately).
 First we cut off the sleeves.  Tip: after you cut off the first sleeve, lay it on top of the other one and use as a pattern so the sleeves are even.
 We wanted blousey shirts so I cut a strip of elastic the size of our waists, and sewed it along the bottom inside seam.
Then I cut one of the sleeves into long strips.  I rolled each strip into a flower.  I didn't want them to look too uniform, so I used slightly different size strips. Then I sewed all 7 on the shirt.
Tadaa!
 For my shirt, I also cut off and hemmed the sleeves and put elastic on the bottom. I made a knit bloom out of the sleeve (tutorial here).  I cut 5 small strips of sleeve.  I sewed 4 on the shirt and one on top of the bloom.
(the color's off-but you can see the detail)
 Tadaa! #2
 We accessorized with some cute bracelets my kid make.  I wore the owl bracelet and she wore the pink ones.
It was a fun night.  The girls introduced their moms and said lots of nice things and then the Moms returned the favor.  We showed off our talents and talked about what we like to do together.  One big warm and fuzzy evening.
It would be great to end in a mother-daughter pic, but we never took one.

Linking up here.
UPDATE: I've been giggling quietly all afternoon as I imagine perfoming my "talents" in a talent show. 
- I could take the audience on in a game of Trivial Pursuit
-I could boss them around
-I could have them donate random stuff from thier purses and create craft masterpieces with only the aid of my trusty glue gun
-I could dazzle them for hours painting a wall
-I could speak to them in only really poor German
-amaze them with how fast I can read


Visit thecsiproject.com

Wednesday, May 18, 2011

Bookclub Grub

I had my first chance to host at my new bookclub.  I picked Charms for an Easy Life by Kaye Gibbons (my review here).  It always stresses me a little picking the book.  Hopefully, no one hated it-at least they were all too polite to say anything. 

I'm a big fan of themes.  I thought my theme would be "charms" and what is more charming than mini-cupcakes.
Lemon-meringue Charms (recipe here)
Strawberry Short-Charms

I actually just made up a batch of the lemon meringue cupcakes.  Before I added the lemon juice and zest, I poured about 1/2 of the batter in the tins.  Then I whipped up some cream and put half a fresh strawberry on each. Easy, yummy and pretty.

I also made "Brownie Charms".  I just made a batch of box brownies and baked them in the mini-muffin tins.  I only baked them for 9 minutes.

MARTHA TIP:  I stole this from my SIL.  She always makes little signs for her food at parties. It looks pretty and it lets people know what they're eating.


If you're looking for something fun for your kids to do:  Please enter to win a kit to build a 5 foot tall paper roller coaster.  (ends 5/25)

Kitchen Re-Do

This is acutally my second kitchen re-do.  Here's my first: http://trophyw.blogspot.com/2011/05/kitchen-makeover.html


So above are pictures of our kitchen when we were house-hunting. It doesn't really look all that bad in the pictures, but the colors really clashed. There was a lot of yellow in the tile, the counter-tops are a more warmer brown and they both clashed with the orange tones of the oak. Also, I'm just not a huge oak fan. I'm not crazy about the appliances either-especially the fridge.  Technically I own very lovely stainless ones, they are just currently being enjoyed by my renters.
 I took all the doors of the hinges and covered the inside w/ plastic.  This took 2 days and ended up being a huge waste of time. I scrubbed them down with soap and water.


 I used a roller on my first kitchen, but wanted to use a sprayer this time.  In about 5 minutes, I learned that paint sprayers are not indoor toys-at least when I'm in control.  I got paint EVERYWHERE.  I ended up rolling the frames and spraying the doors outside.  Do you see the doors propped up on cans?  You have to let them dry like that so you don't get drips along the edges.  I used a coat of grey primer and several coats of Behr paint w/ the primer in it.  There are a few drips, but mostly they look pretty good. The entire process took 4 very long days.  I did it over Christmas break and sent all the kids to my parents.


I picked out this moulding.  It was the most expensive,but still only about $120 for the entire kitchen.  This may be a huge craft blog crime, but I hired someone to do hang it for us.  I don't have the tools or know- how to do it myself.  He was a here a few hours and so it was worth the money to  me.


 (any ideas for my ugly fridge?)
( I was a little short on moulding and had to go buy some more and hadn't painted it yet when I took the picture)
I wasn't going to put up hardware, but here you can see what my daughter's nails did in 5 months time. I'm trying to figure out what color/ style I want. Suggestions? 


I've still got to add some accessories etc, but the hard part is done and I am thrilled how it turned out. FYI: I used Behr's Espresso Bean paint w/ the primer in it.


Linking up here.
Visit thecsiproject.com

Tuesday, May 17, 2011

Chocolate, Sugar, Butter, What's not to like?


I don't feel like there's anything wrong with plain old brownies from a box.  My daughter, however, feels that they are good enough to eat at home, but they are not fancy enough to bring places. By the way her stenciled brownies have had more page views than any of my projects.  She found this recipe here http://allrecipes.com/Recipe/Brownie-Frosting/Detail.aspx.

We use a regular box brownie mix.
Ingredients:
6 tablespoons milk
6 tablespoons butter, softened
1 1/2 cups white sugar
1 cup chocolate chips
1 dash vanilla extract
Directions:
1.Combine the milk, butter, and sugar together in a saucepan and bring to a boil; allow to cook at a rolling boil for 30 seconds and immediately remove from heat. Add the chocolate chips and vanilla to the milk mixture and stir until the chips are completelymelted.  Pour over warm brownies.
They are yummy! 

We like them b/c they are fast and you don't have to wait for them to cool.  We just grab the entire pan and go. These are best to take someplace, b/c if they stick around your house you will eat them all.


If you've got any bored kids  (or adults), please enter my give-away for a kit that will build a 5 foot paper roller coaster.
Linking up here.

Paper Roller Coaster-Giveaway

My 10-year-old son just came home from school proudly carrying his very own paper roller coaster.
It's made from folded pieces of cardstock. Genius!  I declared it totally blog worthy and snapped a picture.  My son spent most of the afternoon adjusting it and sending down marbles.  If you know my son, it would surprise you to see him sitting and doing anything for longer than a few minutes.  I was so impressed, that I contacted the company to ask if I could blog about it. I told them I thought that paper roller coasters were so cool, that I wouldn't even charge them anything.   
The Super Coaster
They sent me some templates.  My husband and son saw this one on the website and they are now dreaming up their own super-coasters.

So if you are looking for something to occupy your housefull of kids all summer, then check out their website http://paperrollercoasters.com/index.htm. Their products start at $20 -which is a great deal compared to most building toys. Supporting my boy's LEGO habit is putting us in the poorhouse and we've never gotten to build anything 5 feet tall.


How would you like to win one for free? They are generously giving away an Individual Set, which includes detailed directions and enough pre-printed card stock to build a five-foot tall roller coaster.  It even comes with 5 marbles.

To enter, please check out http://paperrollercoasters.com/index.htm and leave me a comment about what you saw and who you know that would love to build a paper roller coaster (scout troops, home school groups, your family, etc). Easy Peasy. You don't have to "like" me or "follow me" or sign away your first born.  Just leave a comment.

Contest ends May 25th at midnight CST.  I will choose one comment using random.org and the winner will receive on Individual  Kit ($30 value). Shipping to US only. UPDATE: For any of you that live outside the US, you can win a set of Electronic Templates - A digital version of the directions with over eighty color photographs, and eleven templates suitable for printing onto card stock.  You will also receive downloadable directions.

Individual pack
I'll post the winner Thursday May 26th, along with pictures of whatever my boys came up with. 

Also, check out their facebook page for more pictures, tips, and videos. I'm sure they'd appreciated it if you "Liked" them.

Linking up here.

Blogger is reporting issues w/ people not being able to leave comments.  If you can't leave a comment please e-mail your comment @lilbirdz1@yahoo.com.  Hopefully the problem is fixed soon.